Thursday, February 19, 2009

Valentine Scrapbook pages

The minute I saw this layout posted by Julie2515 on Paperwings, I knew that I wanted to do the same thing! I love the combo of black, white and red - it just screams amore!

Ink: Brilliance Rocket Red (from the Basic Dew Drop Set S-7001), Noir Palette (TT220), Embossing Stamp Pad (S-775), White Embossing Powder (S-759)
Paper: Scarlet 12 x 12 Cardstock (V-291), White 12 x 12 Cardstock (V-292), Black 12 x 12 Cardstock (V-246)
Stamps: Just A Note (T2820), Love Blooms (T3025), Fancy Curls (T2804)
Punches: Mega and Giga Scallop circle (D700 & D701)
Tools: Heat gun (F-163), acrylic blocks (G-515), paper cutter, adhesive (I used Wonder tape (F-241) on the ribbon), Cropadile II Big Bite (K-102), Scissors.
Other: White flower (from Assorted Bitty Blossoms D-437), Black Ribbon Brads (F-926), Black Scrapper's Floss (F-912), Large red brad, ribbon

Tips and Techniques:

Tearing: To make tearing the black cardstock easier, use a wet q-tip to trace the line you want to tear upon. This will help make your tearing easier and more uniform!

Embossing: For the embossed black paper, start by wiping black cardstock with a used dryer sheet. This will help prevent the embossing powder from sticking where it doesn't belong! Next, stamp your swirls using the embossing stamp pad. This has no color, but dries slowly to allow time for you to place your embossing powder. Next, sprinkle white embossing powder generously onto your stamped images. Give the back of the cardstock a good flick to dislodge any stray grains of powder on your paper. Heat using your heat gun until powder melts and becomes shiny.

Love Forever Card - Second Generation Stamping

This card is pretty self-explanatory. The one technique we used is called: Second Generation Stamping. This is what we used to create the "Love" background.

What you do is this: Ink up your image and press it onto a scrap piece of paper. Then without re-inking, stamp on your card. This will give a lighter image, or a second generation image. Then you can stamp another image on top of it - this time full strength! Looks cool, doesn't it?

For this card I used:
Ink: L'Amore red Palette (TT-195)
Paper: Scarlett Cardstock (V237), light pink cardstock (V-42), white cardstock (V-290)
Stamps: Forever Family (T2952)
Other: SU scallop edge punch, ribbon, stickles

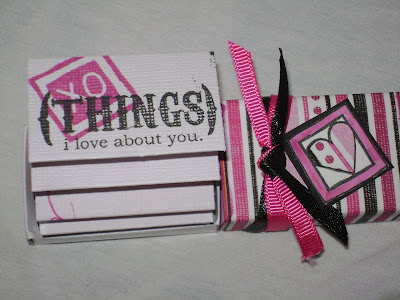
Matchbox Valentine Tutorial

I loved this little valentine box! Small, but filled with love (and a miniature bar of chocolate, of course!). Thanks to Heather Scott for the pictures and how-to's!

SUPPLIES:
  • Empty matchbox (I got 10 for 100 yen!)

  • Patterned paper (I used TAC's UPTOWN GIRL V-922). Cut into a strip 2 1/4" wide x 4 1/4" long (or as long and wide as your matchbox). Use an additional scrap to stamp your image on.

  • Scrap of black paper (cut into 1 inch square or enough to mount your stamped image on)

  • 12x12 sheet white cardstock

  • black ribbon

  • pink ribbon

  • Noir Palette Ink (TT-220)

  • Claret Palette Ink (TT-194)

  • Love Doodles Stamp Set (T-2709)

  • This Boy Stamp Set (T-2893)

  • Paper cutter

  • Scor Pal

  • Scissors

  • Tombow Blending Pen (F-20)

  • Sponge

  • Adhesive
INSTRUCTIONS:
Step 1) You will begin by inking the edges of the matchbox with Claret Palette ink.

I also take a sponge and try to get inside the edges a bit.


Step 2) Then adhere your pattern piece around the outside of the box. Be sure your adhesive gets right up to the edges so that the paper sticks down nice and tight.

Step 3) Next you will paper piece your heart - start by stamping your image onto white and a scrap of your pattern piece.

Place a piece of tape on the back side of the pattern piece and cut out - The Mini Kai Scissors work great for tiny cutting jobs..
Adhere heart over top of same heart on white piece. Cut out white piece.

Step 4) Color in the edge with a blender pen and ink pad - by simply tapping the tip of the blender on top of your ink pad and then coloring like a marker. When the colors get lighter just tap again and repeat.

Mount on the black square of cardstock and adhere to top of box. Tie ribbon around box.

Step 5) Now for the acordian folded insert! Cut your white cardstock into a strip 11"long x 2" wide (this measurement is for the matchboxes purchased at the 100 yen store. If you are in the US, you would want to cut it to 11 1/2" long x 1 7/8 " wide.)

Step 6)Now to score your accordian - the Scor-pal makes it SO easy! Because you want to score every 1 1/4 inches you need to take your 11" x 2" piece of white cardstock and place it at the 3" mark. on your Scor-pal. Score at 4 1/4.

Now slide your scored line and place it into the 3" line. (the dent of the score will sink right into the line!) Now score again at 4 1/4. Repeat until you reach the end of your paper.


Step 7) Stamp your images from the "Love Doodles" stamp set, and the "Things I Love About You" stamp from "This Boy" stamp set on both sides of the strip.


Step 8) Fold on the lines and you are done!!

Monday, February 2, 2009

February Stamp Camp!!

February is the month for love - and I LOVE these adorable Valentine projects!
Here is a peek at what we will be doing at our Stamp Camp on Friday, Feb. 6th:

Thanks to Heather Scott, and Julie 2125 (Paper Wings) for the inspiration!

Peek into Serendipity!

Here is a peek into our new magalog, Serendipity!